RAIM Testing with Skydel
Technical & Application Notes
Introduction
This document provides a short guide on how to use Skydel to test out the Receiver Autonomous Integrity Monitoring (RAIM) performances of receivers, specifically setting up a Pseudo Range (PR) offset ramp to artificially inject errors in RF generated signals. In this document we present multiple Skydel scenarios to perform RAIM testing in different conditions, with different receivers.
Scenarios presented:
- RAIM testing with a full sky configuration
- RAIM testing with the minimum number of Space Vehicles (SV) for RAIM and high Position Dilution of Precision (PDOP)
Skydel scenarios on Safran’s GitHub:
RAIM
RAIM is a technology that evaluates the integrity of individual signals received by a receiver system. It is heavily used in safety-critical GNSS applications such as in aviation or marine navigation to ensure accurate calculated position even in case of faulty incoming GNSS signals, caused by various factors such as ionospheric anomalies, the speed of a traveling aircraft, or due to other satellite clock and ephemeris faults.
RAIM technology uses redundant satellites to produce multiple GNSS position fixes and compares them to one another to determine if a fault exists with any other GNSS signals. In principle, it takes 4 healthy GNSS signals for a receiver to determine its location. RAIM requires a 5th satellite to determine if any of the satellites’ data are erroneous. If a satellite’s data is identified as erroneous, the receiver can deselect it and base its position from the four remaining satellites.
Therefore, Fault Detection (FD) in RAIM requires at least 5 visible SV. Newer receivers incorporate Fault Detection and Exclusion (FDE), for which at least 6 satellites are required, to ensure that RAIM remains available in the case where a signal coming from one SV is detected as faulty and excluded in the computation of the receivers’ position.
RAIM Testing
RAIM testing involves evaluating the receiver’s ability to detect and exclude faulty satellite signals by comparing redundant measurements from multiple satellites. Therefore, for testing the RAIM capabilities of a receiver, at least 5 visible SV are required for testing FD.
In order to test RAIM, it is desirable to have the capability to control the integrity of the signals broadcasted by the visible SVs in order to produce faulty signals for evaluating the receivers RAIM capability. This is possible in Skydel by implementing a scenario with PR offsets on space vehicles.
1. Raim testing in Skydel
1.1 Hardware Setup
A single SDR is required for this procedure, therefore any GSG hardware model can be used to perform RAIM testing.
Note that you may also use your own hardware as long as you have an SDR along with Skydel. Furthermore, you will need the receiver for which you are testing its RAIM capabilities. In this document, we will use a Ublox receiver as well as a Septentrio receiver.
1.2 Skydel Scenarios
In order to demonstrate RAIM testing in Skydel, we will go through 2 different scenarios showcasing different types of configurations and receivers:
- RAIM testing with a full sky
- RAIM testing with the minimum number of SV for RAIM and high PDOP
1.2.1 Scenario 1: RAIM testing with a full sky in Skydel
Open a Skydel instance and start a new configuration. Navigate to Settings – Output.

Signal Selection
Click the Edit button for the RF-A output of Radio 1 and select the desired signals. In our case we will select GPS L1 C/A.

Start Time
Within the “Start Time” setting, make sure the GPS Time selected is set to “Custom Time” with the following start time:

Vehicle selection
Keep the vehicle trajectory type to “Fixed”, this should already be the case since it is the default trajectory type when creating a new Skydel configuration. We will be using the following coordinates in Skydel.

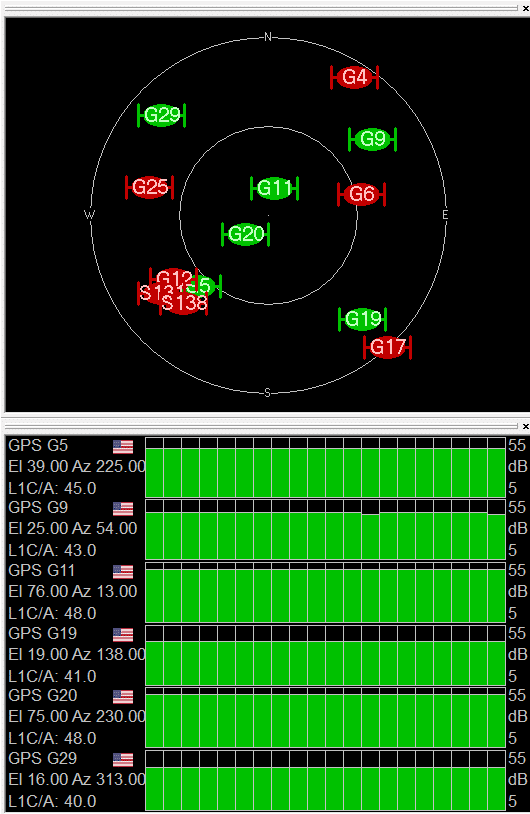
You should now be able to see all SV that are visible in the Sky through the constellation tab.

Note that the critical requirement for RAIM is that there should be at least 5 visible satellites to the receiver, so be sure to check that this is the case.
Run the scenario and apply a PR offset ramp
With a receiver connected, you may now run the scenario in Skydel using the Start button. Give some time to the receiver to perform its fix. Once this is done you may go to the setting of the specific constellation being used (in this case, GPS), and in “Errors>Pseudorange Offset” click on “Add”.
Select a SV ID, an offset and a start time, hold start time, and a Hold Stop time.
In our case we apply a 1500m PR offset on SV 12 with the following time parameters:

We repeat the same process for SV 6 and 25.

1.2.1.1 Running Scenario 1 with a Ublox receiver
Open U-center and connect to the receiver. In our example, we’ll use a u-blox F9 high precision GNSS module.
In U-center, add the Deviation Map, Satellite Position view, Satellite Level History view. Once the position fix is done and the PR offset ramp kicks in, the receiver’s RAIM algorithm will start to ignore the erroneous SV in its computed PVT.
Looking at the Deviation Map as shown below, we can visualize the tracking of the PVT by the receiver. We observe that the computed position by the receiver is relatively consistent and matches our expectations since we set the vehicle as a fixed point within the Skydel configuration, therefore showing that the erroneous SVs did not affect the computed receiver position thanks to RAIM.

Similarly, taking a look at the Satellite view, we see that SV 6-12-25 all appear in red which signifies they were rejected in the computation of the receiver’s position. In the same way, we also observe that the three erroneous SVs do not appear in the Satellite Level History view since they are not used to obtain the receiver’s PVT.
Therefore we can see that RAIM has successfully identified the erronous PR offset applied to SVs 6-12-25 and allowed to receiver to obtain an error-free PVT.
1.2.1.2 Running the scenario with Septentrio receiver
Now let’s use a Septentrio receiver, the PolaRx5. We use RxControl to track the performance and status of the receiver. The scenario is run twice, once with the RAIM activated on the receiver, and then with RAIM disabled to demonstrate the difference.
1.2.1.2.1 With RAIM activated
By default, RAIM should be activated in RxControl, you can check by going in Navigation>Receiver Operation>Position within RxControl.

Then under the Integrity tab, verify that RAIM is enabled.

Once the position fix is done and the PR offset ramp kicks in, the receiver’s RAIM algorithm will start to ignore the erroneous SV in its computed PVT. This is shown in the Channel Table in RxControl, where the SV on which the PR offset was applied have their status marked in red as “Track (Rejected)”.

Taking a look at the Planimetric Plot in RxControl, we can also visualize the tracking of the PVT by the receiver. We observe that during the initial stage of the PR offset ramp up, the position computed by the receiver started deviating before eventually rejecting the erroneous SV once the PR offset becomes large enough that it is detected through RAIM. At that point, the computed position is corrected and corresponds to our expected position for the fixed positioned vehicle we set up in the Skydel scenario.
1.2.1.2.2 Without RAIM activated
As mentioned in the previous section, it is possible to enable/disable RAIM within RxControl. Run the same scenario again in Skydel, and turn off RAIM within RxControl. After waiting enough time for the PR offset to kick in, we can observe that in the Channel Table available in RxControl, the erroneous SV (G6, G12, G25) are still being tracked and used to perform the receiver’s PVT.

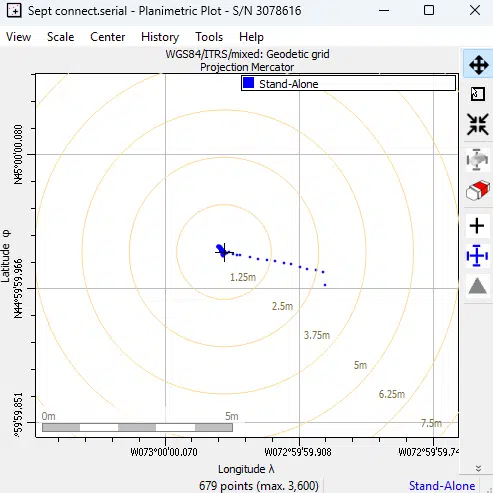
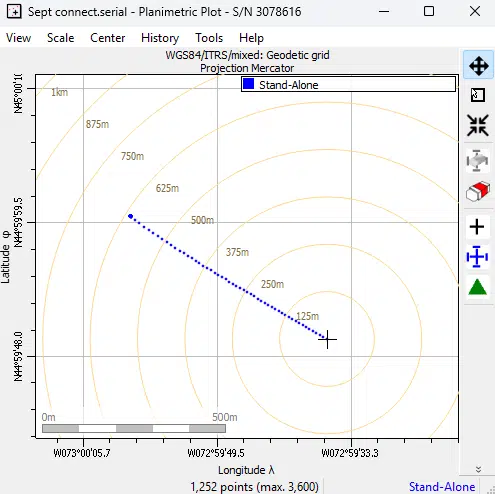
Taking a look at the Planimetric Plot in RxControl, we observe that as expected, without RAIM enabled, the receiver’s PVT is affected and tricked into a false position. The plot below shows the position perceived by the receiver deviating increasingly as the PR ramp is increasing, despite the vehicle type in the Skydel simulation being set to fixed.

1.2.2 Scenario 2: RAIM testing with minimum number of SV and high DOP
Let’s now design a new scenario in Skydel to put more stress on the receiver. For this scenario, we will only use the minimum number of required SV used to perform RAIM Fault Detection, hence 5 satellites, with one of them having a PR offset applied. To further add stress on the receiver, the SVs that appear in the view of the receiver are selected such that the PDOP is high.
Open a Skydel instance and start a new configuration. Navigate to Settings>Output.
Click the Edit button for the RF-A output of Radio 1 and select the desired signals. In our case we will select GPS L1 C/A.
Signal Selection
Start Time
Within the “Start Time” setting, make sure the GPS Time selected is set to “Custom Time” with the following start time:
Vehicle selection
Keep the vehicle trajectory type to “fixed”, this should already be the case since it is the default trajectory type when creating a new Skydel configuration. We will be using the following coordinates in Skydel.
Enable only the required SVs
Now go to the setting of the specific constellation being used (in this case, GPS), and in “Signal Enable/Disable” select only the following SVs: 5, 11, 12, 20, 25.

You should now be able to see all SVs that are visible in the Sky through the constellation tab.

Run the scenario and apply a PR offset ramp
For this example, we’ll use a Septentrio PolaRx5 receiver.
Run the scenario in Skydel using the Start button. Give some time to the receiver to perform its fix. Once this is done you may go to the setting of the specific constellation being used (in this case, GPS), and in “Errors>Pseudorange offset” click on “add”.
Select a SV ID, an offset and a start time, hold start time, and a Hold Stop time.
In our case we apply a 1500m offset on SV 25 with the following time parameters:

You should now see this in your Pseudo-range Error setting:

1.2.2.1 Running Scenario 2 with Septentrio PolaRx5 receiver with RAIM enabled
In this scenario, make sure that RAIM is enabled within RxControl.
Once the receiver has obtained its fixed, in RxControl we can observe the PDOP resulting from the sky configuration set in Skydel. The goal of this scenario was to generate a high PDOP, which we succeeded in, as we can see in the DOP section of the Receiver Status tab in RxControl, the PDOP has a value of 9.75, which is considerably high.

Also note that once the fix is done but the PR offset has not kicked in yet, we can see that RAIM is available since there are 5 visible SVs.

Once the PR offset ramp kicks in, RAIM ignores the erroneous SV (G25 here), and the receiver will obtain its PVT by using the 4 remaining SVs. We can see this in the Channel Table in RxControl, where SV G25 is marked in red as “Track (Rejected)”.

Similarly, we can see that in the Planimetric Plot in RxControl, the computed position of the receiver does not deviate.

Now that RAIM has excluded one of the SVs, the receiver is left with 4 SVs to perform its PVT, thus not meeting the minimum SV requirement to ensure RAIM in the event that another SV becomes erroneous. This is shown in the RAIM tab, with all of its field marked as N/A.

Furthermore, by taking out one of the SVs in the computation of the receiver’s position, we expect the PDOP to degrade, and indeed, we observe that it has now increased to 10.17.

1.2.2.2 Running Scenario 2 with Septentrio PolaRx5 receiver with RAIM disabled
Now let’s repeat Scenario 2 but this time we disable RAIM in the RxControl settings (see section 1.2.1.2.1).
Let the receiver obtain its PVT fix.
Once the PR offset ramp kicks in, with RAIM disabled on the receiver, the erroneous SV will be used to perform the receiver’s PVT, as shown in the Channel Table in RxControl, where SV G25 is displayed in green as “Track (PVT)”.
Looking at the Planimetric Plot, we can see the receiver’s position deviating drastically as the PR offset ramp is being applied on SV G25 now that RAIM is disabled.
Hence, the effects of RAIM can be clearly demonstrated using a Skydel scenario with a receiver, by applying a PR offset ramp.
Conclusion
Through this application note, we have shown how to test the RAIM capabilities of receivers using Skydel simulator to inject a PR offset on specific SV signals. We also demonstrated the different outcomes when RAIM is enabled versus when it is disabled. Two scenarios are proposed, the first with a full sky, and the second with only the minimum number of SVs required for FD with RAIM with a high PDOP. All this is possible thanks to Skydel’s flexibility and ease of use.