Controlling Skydel Remotely with CANoe
Technical & Application Notes
Introduction
GSG-7 is a positioning, navigation, and timing test solution offered through Safran’s GSG family of simulators powered by Skydel Simulation Engine. It was developed to deliver the highest standard of Global Navigation Satellite System (GNSS) signal testing and sensor simulation performance in an easy-to-use upgradeable and scalable platform.
This document explains how to feed navigation data to SKYDEL from CANoe, a versatile software solution from Vector company for the development, analysis and testing of individual software components or subsystems as well as electronic control units (ECUs) and entire distributed networks. In this document, we will focus on multiple scenario types such as starting a basic scenario in Skydel from CANoe or sending a trajectory defined in Canoe to Skydel in real time (HIL mode in Skydel). This document will include a summary of the steps, and a detailed description of the scripts and functions used to communicate with Skydel in the CANoe environment.
Communicating with Skydel
The communication between CANoe and Skydel will be done using the API (Application Programming Interface) of Skydel. The objective is to create a script in CAPL (Communication Access Programming Language of CANoe) to control Skydel remotely. It will be possible to run it on the same machine as Skydel or use another machine and control Skydel via a TCP/IP connection.
Skydel provides API clients in the following languages: Python, C#, C++. For this application, we will use the C++ language to create a DLL and import it into CANoe. The different steps of the setup are:
- Create a DLL that will be readable by CANoe
- Create the VMODULE file which corresponds to the library of functions
- Create the CAN file and build your CAPL script
- Configure your scenario in CANoe.
In this application note, we demonstrate different examples of CANoe scenarios controlling Skydel remotely. The licences needed to run this type of scenarios are:
For CANoe:
- CANoe pro to insure the communication via TCP/IP with Skydel
- Car2x option to test V2X scenarios (only needed for the last example in section D.c)
For Skydel:
- SKY-SSE: Skydel Software with high end capabilities,
- SKY-HIL: Unlock capability to input simulated trajectory in real-time via API for Skydel Simulation Engine
- The licences for the GNSS signals to be generated.

Please note that the CANoe documentation is downloaded in local in your computer in the folder: C:\Program Files\Vector CANoe <your version>\Help01\CANoeCANalyzerHTML5\CANoeCANalyzer.htm
As CANoe allows to import a C++ DLL in the CAPL scripts, the objective will be to include the Skydel API into this DLL to be able to use it from CANoe. This DLL will be shaped as the CAPLdll example of CANoe.
A. Create a DLL containing Skydel API
Prerequisites: set the development environment on the computer running the CANoe software. You will find everything in the following link: Windows 10 | Skydel Plug-ins Documentation.
Once done, here are the steps to build your DLL:
a) Create a new folder containing the project
Open the folder containing the Sample Configurations folder of your Canoe version (usually in C:\Users\Public\Documents\Vector\CANoe\Sample Configurations <your version>).
Go to the “Programming” folder.

Duplicate the CAPLdll folder and rename it “Skydel_CAPLdll” for example.
Open this new folder.
b) Add the Skydel API
Go to the “CMakeProject” folder.
In another tab, in the “C:\Users\<username>\Documents\Skydel-SDX\API\Cpp” you will find the “sdx-api” folder. Copy it and paste it in the “CMakeProject” folder opened above.

c) Change the CMakeLists file
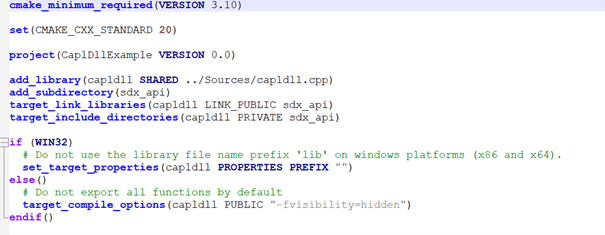
Open the CMakeLists.txt and add the following lines:
- Under the “cmake_minimum_required(VERSION 3.10)” line:
- set(CMAKE_CXX_STANDARD 20)
- Under the “add_library(capldll SHARED ../Sources/capldll.cpp)” line :
- add_subdirectory(sdx_api)
- target_link_libraries(capldll LINK_PUBLIC sdx_api)
- target_include_directories(capldll PRIVATE sdx_api)
d) Create the Skydel functions needed for the CANoe scenario
The creation of new functions readable by CANoe is done in the “Skydel_CAPLdll/Sources/capldll.cpp” file. This file contains many functions that you don’t need for communicating with Skydel. However, you can use the frame of the file to build the CPP file containing Skydel functions.
There are 4 parts in this file.
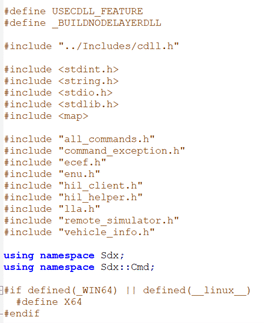
1. The import section
The import section contains the calls to Skydel API. You need to call the files containing the Skydel functions that you want to use.
For example: #include “all_commands.h”
Additionally, you can call the 2 namespaces Sdx and Sdx::Cmd so that you do not have to add them each time you call a Skydel function. The commands are:
- Using namespace Sdx
- Using namespace Sdx::Cmd
Here is an example of an import section of capldll.cpp file.
2. The global variable section
In the global variable section, you define the variables that will be used by the functions during the simulation.
For Skydel, each instance of Skydel need to be defined here using:
- RemoteSimulator sim;
If there is a second instance of Skydel, a second variable needs to be defined (e.g. RemoteSimulator simWorker;) and so on for additional ones.
3. The function section
This is where you define the functions you need to communicate with Skydel in the CAPL script.
For example, you can create a function to create a basic scenario with a circular trajectory and two signals, GPS L1CA and Galileo E1, then, a function to start the scenario and one to stop Skydel.

By default, the first parameter of the function defined must be the handle parameter as a uint32_t type. It will be explained later in the document (in C.c.iii.).
Once done, you need to export the DLL functions to be used in CAPL.
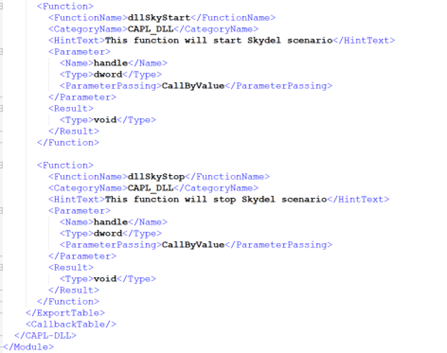
4. The export table section
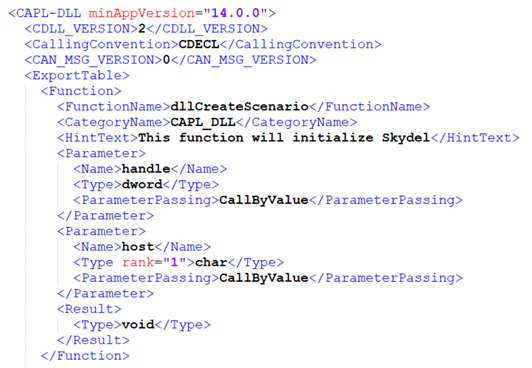
The table section contains the list of functions to be exported. All the Skydel functions defined in the C++ file must be added to this table. Its structure can be found in the Help manual of Vector. You can find below an example and some explanations.
The first row of the table contains version information and must be defined as shown below:
- {CDLL_VERSION_NAME, (CAPL_FARCALL)CDLL_VERSION, “”, “”, CAPL_DLL_CDECL, 0xabcd, CDLL_EXPORT },
- Then, there is a line per function ending by a comma (in green).
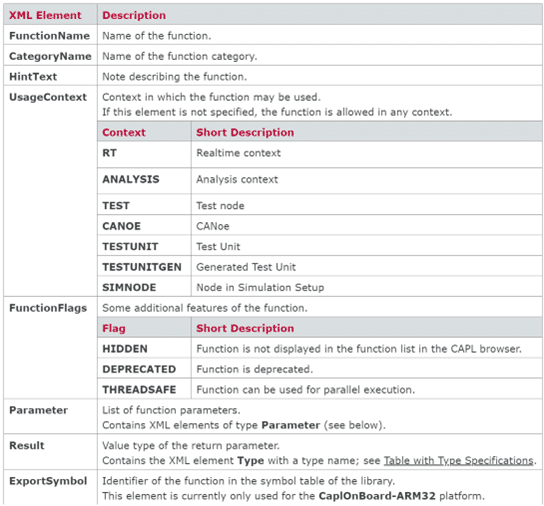
Each line is made of the following parameters:
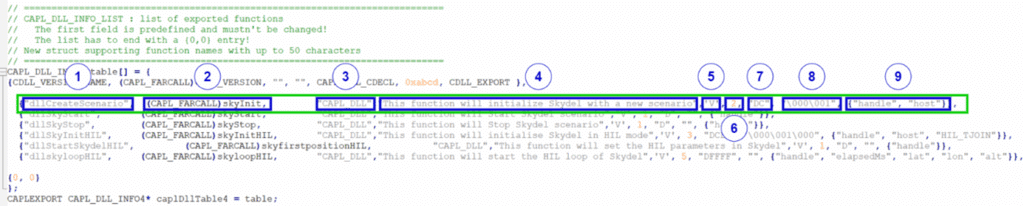
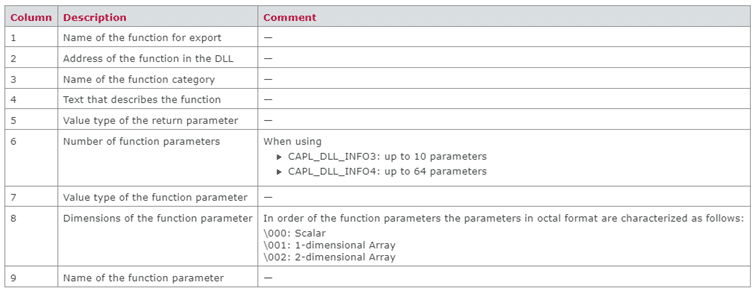
To find more information about the CAPL Export Table you can open the CANoe documentation and search for the “Description of the CAPL Export Table” page.
e) Compile the DLL
At this stage, the customization of the DLL should be done. You need to compile it.
Before compiling the DLL, you need to check the variant of the RT Kernel that is used by CANoe as the execution environment. Go to the CANoe options by clicking on the folder on the top of CANoe software:
In Measurement > General, go to the bottom of the section and check the Execution Environment.
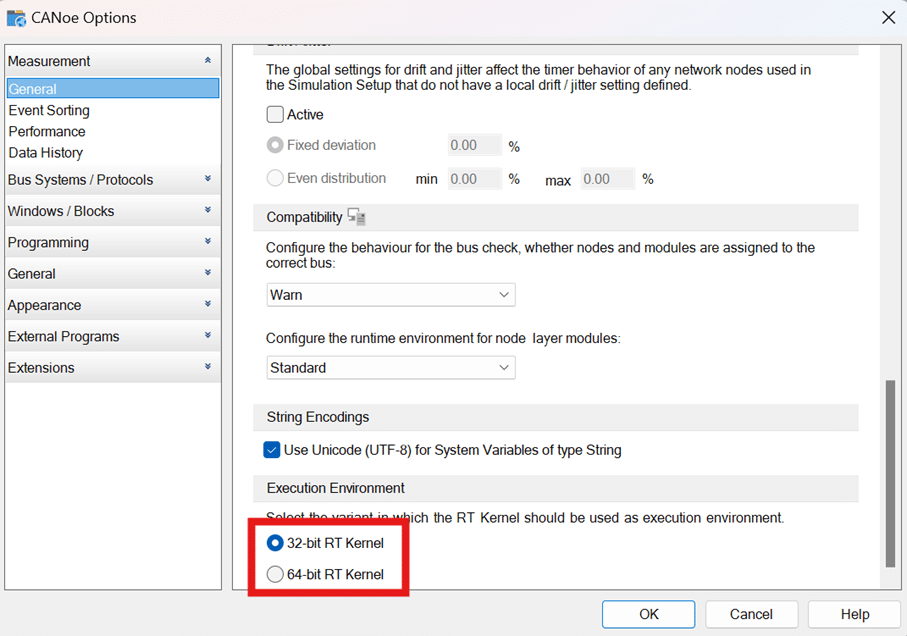
If the execution environment is set to 32-bit RT Kernel, compile the whole project as a DLL running the following commands in the CMakeProject folder:
- mkdir build
- cd build
- call “C:\Program Files (x86)\Microsoft Visual Studio\2019\BuildTools\VC\Auxiliary\Build\vcvars32.bat”
- cmake -G”NMake Makefiles” -DCMAKE_BUILD_TYPE=Release ..
- cmake –build .
If the execution environment is set to 64-bit RT Kernel, compile the whole project as a DLL running the following commands in the CMakeProject folder:
- mkdir build
- cd build
- call “C:\Program Files (x86)\Microsoft Visual Studio\2019\BuildTools\VC\Auxiliary\Build\vcvars64.bat”
- cmake -G”NMake Makefiles” -DCMAKE_BUILD_TYPE=Release ..
- cmake –build .
In your CMakeProject folder, a “build” folder has been created where you can find the “capldll.dll” library. The Skydel API is integrated into the DLL and the Skydel functions you have created should be accessible.
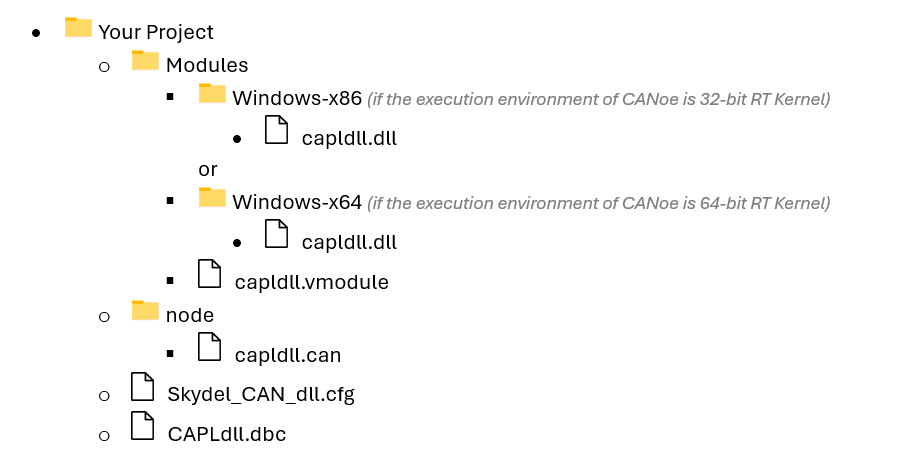
f) Create your project architecture
Now that you have created the DLL, you can create your project. Locally on your PC, create your project folder with the following architecture:
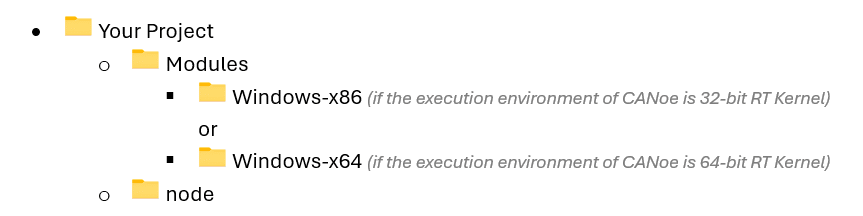
Copy the DLL created and paste it in the Windows-xXX folder (depending on your RT kernel).
The next step is to build a library containing the definition of the different C++ functions of the DLL, the VMODULE.
B. Create a VMODULE file as a CANoe library of functions
If your version of CANoe is greater or equal to 13, you need to create a VMODULE.
An example of a VMODULE can be found in the “Skydel_CAPLdll\EXAMPLE\Modules” folder. You can create your own VMODULE in the Modules folder of Your Project based on this example.
Open the capldll.vmodule in a text editor. The file is made of two parts: the header and the body.
The header
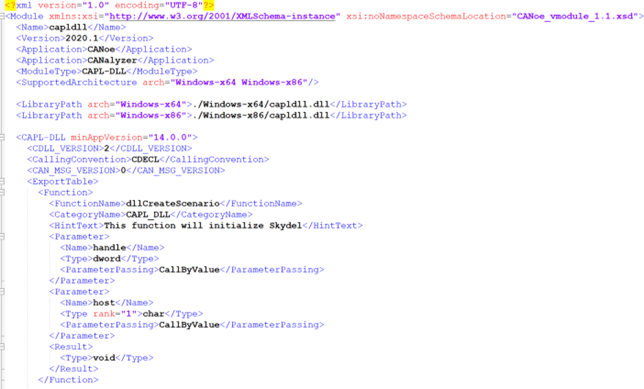
The header gives information about the name of the library, the application, the module type, and the supported architectures. Here is an example:
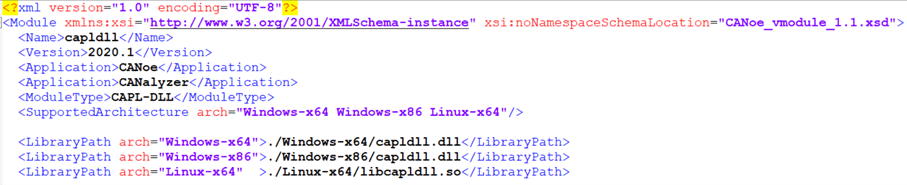
For each architecture defined in the header, you need to give the path to the DLL associated. For example, if Windows-x64 is defined in the supported architectures, you need to declare in the LibraryPath the path “./Windows-x64/capldll.dll”.
The body
The body section contains the definition of the functions. This is what will appear in CANoe when you preview the CAPL functions on the left side of the CAPL Browser. Here is an example with the write function in CANoe. When you click on it, you can find below its definition and the parameters it gets as input.
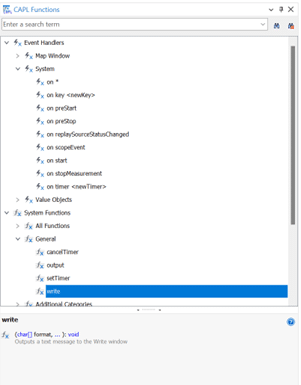
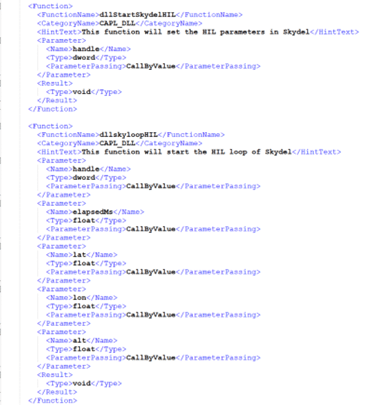
The objective of the VMODULE is to define all the functions that you have created in the DLL. For example, in the section d.iv. above, we have created the dllCreateScenario function. You need to give the definition of the function in the HintText section, define the parameters of the function in the Parameters sections (one section per parameter) and its output in the Result section of the ExportTable.
Here is the definition of each parameter in the VMODULE:
Now your project folder should look like the following:

The next step is to create your CANoe scenario.
C. Create a project and build your CAPL script
a) Create the scenario
Create your CANoe scenario:
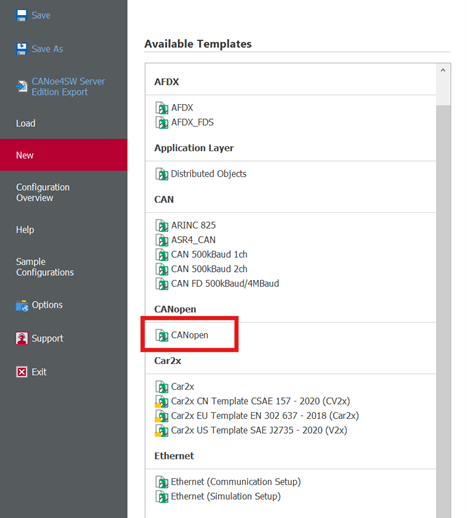
- Open CANoe
- Select New
- Choose the Template you want to start with
- Save the scenario in “Your Project” folder as Skydel_CAN_dll.cfg
b) Configure the scenario
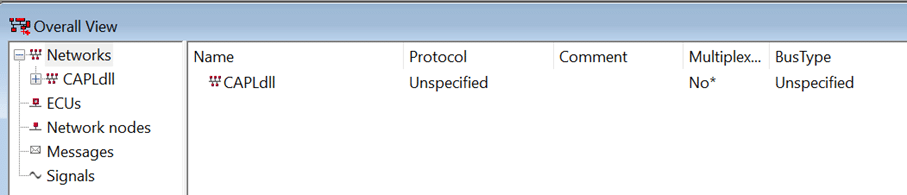
Create a database for the scenario. On the top of CANoe, choose Tools > CANdb++ Editor.

This open a new Vector CANdb++ Editor window. Click on File > Create Database…
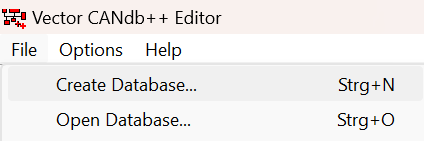
Save it in the “Your Project” folder as CAPLdll.dbc.
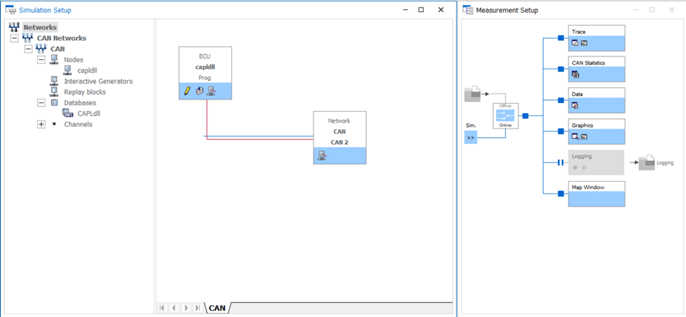
Then adjust the database to match the structure shown below.
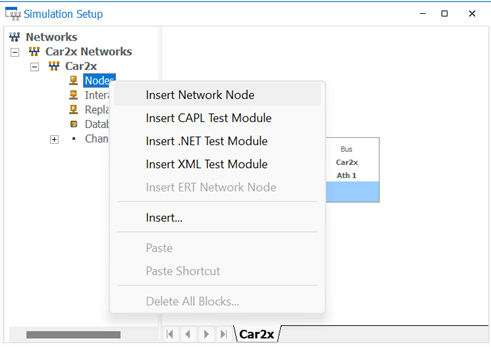
In the Simulation Setup window, create a new Network node. It will be the node that will send commands to Skydel. Click right on “Nodes” and choose Insert Network Node.
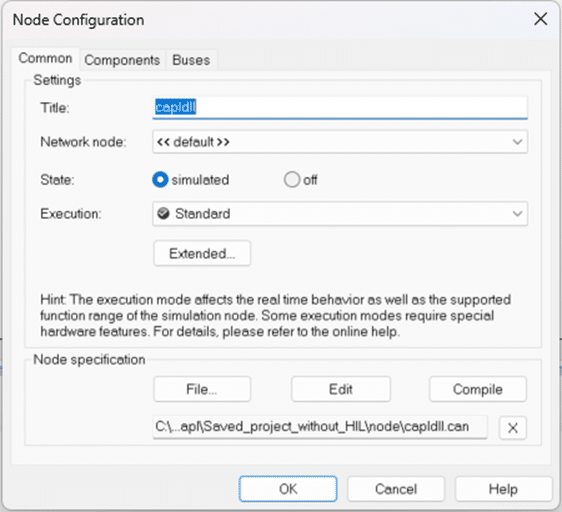
Edit the new node created. Click right on it and choose Configuration.
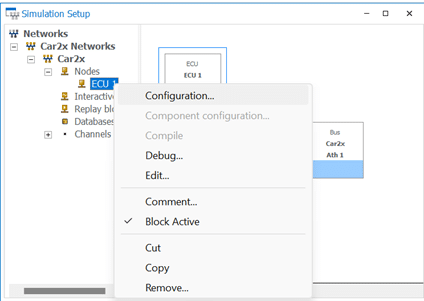
Rename the node title as capldll.

In the Node specification section, select edit to save you CAN file. Choose “Your Project > node” folder location by clicking on Edit and name the file capldll.can. Click on OK.
Now you project folder should have the following architecture:
c) Create the CAPL script
The capldll.can file is a script file written in CAPL, the programming language of CANoe. This script will launch when clicking on the Start button (lightning bolt icon) of the main instance of CANoe.
To edit this file, click on the pencil button of the capldll node.
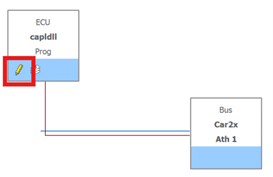
This will open a new window in the Vector CAPL Browser which is empty at the beginning.
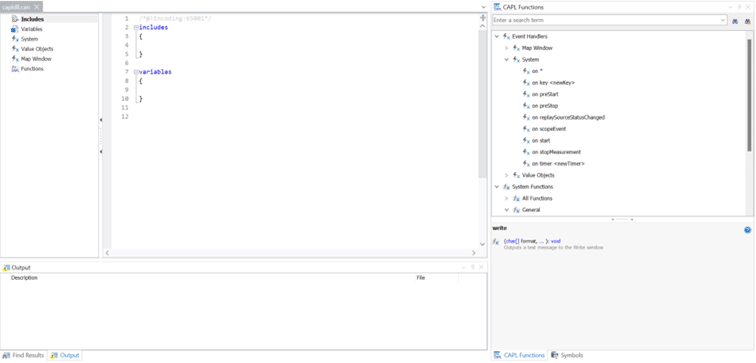
In this script, the functions created in the DLL and listed in the VMODULE are going to be called to communicate with Skydel during the CANoe simulation.
There are 3 parts to edit in the capldll.can file.
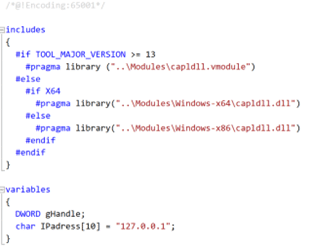
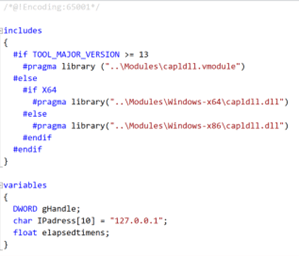
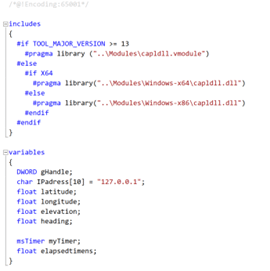
1) The includes section
In the includes section, you need to call the functions created in the DLL to include them in your scenario.
If your version is greater or equal to 13, you’ll call it via the VMODULE. Otherwise, you can directly call the DLL.
To call a library, use the #pragma library(path) command, where path is pointing the relative path to the library.
Here is the includes section:

Depending on your execution environment (32-bit RT Kernel or 64-bit RT Kernel), choose only one of the two calls to the capldll.dll framed in green.
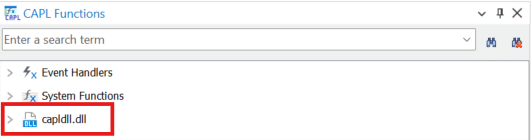
Save your file. After saving it, you should see a new library appearing in the list of available CAPL functions on the right.
2) The variables section
This is where you define the global variables for the script.
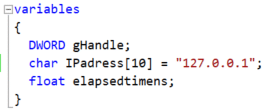
For example, you can define the handle as a DWORD gHandle or the IP address of Skydel as a chain of characters.
3) The event sections
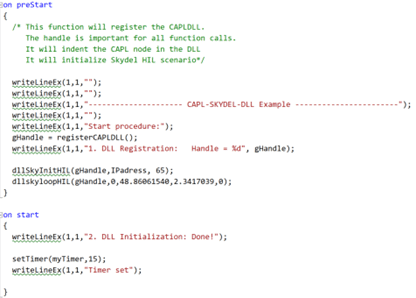
Then, you will start scripting the CAPL node depending on many events. For example, you will have to define the Skydel scenario before the start of the simulation. In that case, you will use the on preStart event.
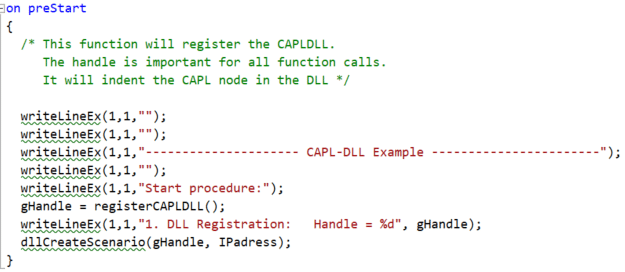
In this section, you need to define:
- the handle variable to access the functions of the DLL.
“An object of class VIACapl represents a CAPL programs. By use of this object, you can access the functions, that are implemented in a CAPL program.
While the measurement is running, every loaded CAPL program is identified by a unique handle (VIACaplHandle). The CAPL programmer gets this handle by a call of the CAPL function ‘registerCAPLDll’, whereas the DLL programmer gets from the VIACapl when the C-Function ‘VIARegisterCDLL’ is called.” extract from the header file of VIA_CDLL.h. - Your Skydel scenario the dllCreateScenario function defined in the DLL.
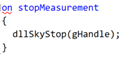
You can also use other events like on Start, on stopMeasurement, on timer or on sysvar to send different changes to Skydel.
Now your project is finished.
D. Start your scenario in CANoe and examples of application
Before starting your scenario in CANoe, you need to make sure an instance of Skydel is opened on your GSG. The GSG hardware model that can be used to run this simulation are:
- GSG-7 (GSG-711, GSG-721, GSG-731)
- GSG-8 (GSG-811, GSG-821, GSG-831, GSG-842)
- GSG-8 GEN2 (GSG-82 GEN2, GSG-84 GEN2, GSG-86 GEN2)
“Skydel software only” can also be used to run this simulation.
To launch Skydel on a Linux system, type Skydel-SDX in the terminal. In Windows, locate Safran’s Skydel in the start menu and click on it.

Click “Continue” and then select “New Configuration.”
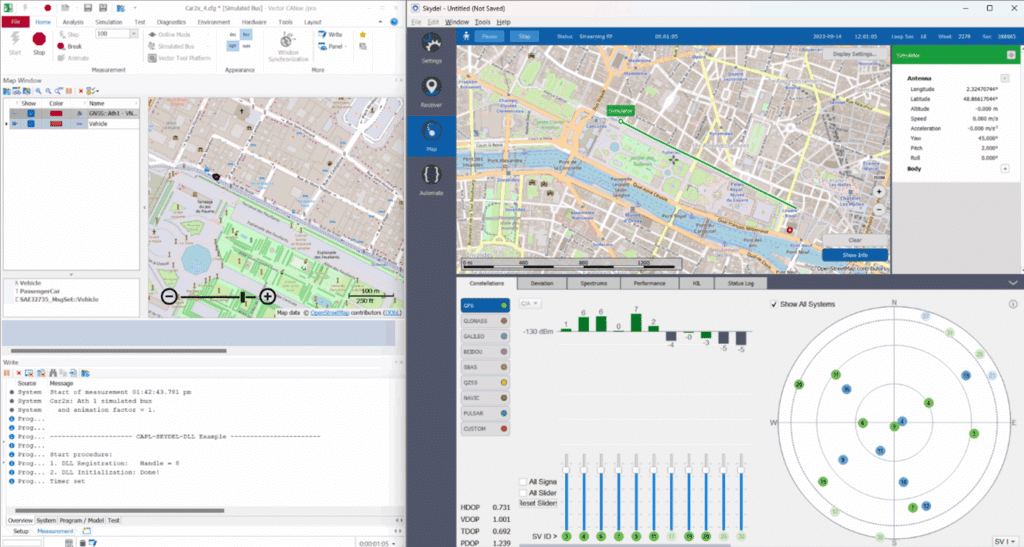
Now, launch your CANoe scenario by clicking on the Start button (lightning bolt icon) in the Home panel.
Skydel will launch at the same time, and you can see that it is controlled remotely when the robot appears on the top.

Now let’s see some examples of typical scenarios:
- Classic scenario with predefined trajectory
- HIL scenario using the GPS section of CANoe
- HIL scenario using the Car2x option of CANoe
Classic scenario with predefined trajectory
This scenario intends to provide simple commands to Skydel from the CANoe software. The objective is to create a Skydel scenario running in NoneRT mode with GPS L1CA and GALILEO E1. The trajectory of the vehicle is predefined as a circle.
The scenario should start at the beginning of the CANoe simulation and stop when stopping the CANoe one.
DLL Functions
Three functions are defined in the DLL for this example:
- skyInit: initializes the scenario of Skydel with the trajectory and the signals
- handle (DWORD): the handle parameter for the node
- host[] (const char): the IP address of Skydel
- skyStart: Start the Skydel scenario
- handle (DWORD): the handle parameter for the node
- skyStop: Stop the Skydel scenario
- handle (DWORD): the handle parameter for the node

The export table has the following parameters:

VMODULE settings
Here is the complete VMODULE file for this example. In the following examples, only the functions sections will be presented.
For the host parameter, a rank of 1 is added because it is an array of characters of one dimension.
CAPL script
Here is the CAPL script.

Setting up the scenario
Open your CANoe software and create a new CANopen scenario.
Save it in your project folder. Edit your ECU node and load your CAN file created before.
Launch the simulation.

The simulation runs Skydel from CANoe with a simple configuration with GPS L1CA and GALILEO E1 signals and a predefined circle trajectory.
HIL scenario using the GPS section of CANoe
This scenario intends to feed Skydel with GPS positions from the CANoe software in real time using the HIL capability of Skydel. The objective is to create a Skydel scenario running in NoneRT mode with GPS L1CA and GALILEO E1.
The scenario should start at the beginning of the CANoe simulation and stop when stopping the CANoe one.
DLL functions
Three functions are defined in the DLL for this example:
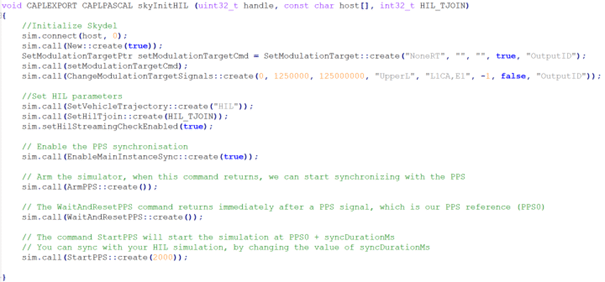
- skyInitHIL: initializes the scenario of Skydel with the signals and the HIL parameters
- handle (DWORD): the handle parameter for the node
- host[] (const char): the IP address of Skydel
- HIL_TJOIN (int32_t): the tjoin parameter for the HIL simulation of Skydel
- skyloopHIL: Sends a position to Skydel
- handle (DWORD): the handle parameter for the node
- elapsedns (double): the elapsed time of the simulation in nanosecond
- lat (double): the latitude of the vehicle at the previous elapsed time
- lon (double): the longitude of the vehicle at the previous elapsed time
- alt (double): the altitude of the vehicle at the previous elapsed time
- skyStop: Stops the Skydel scenario
- handle (DWORD): the handle parameter for the node


VMODULE settings
Here are the new functions of the VMODULE file for this example.
CAPL script
Here is the CAPL script.

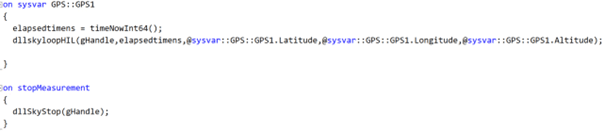
Each time the GPS::GPS1 variable changes during the scenario, CANoe sends the new position to Skydel in real time. In the next section, the GPS::GPS1 settings in CANoe are explained.
Set up the scenario
Open your CANoe software and create a new CANopen scenario.
Save it in your project folder. As in the previous scenario, edit your ECU node and load your previously created CAN file.
In the Map Window of Canoe, click on the Folder button to import a GPS trajectory.
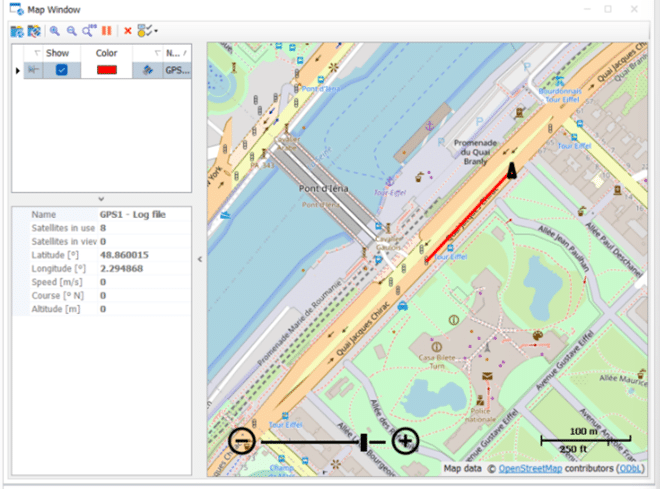
Load the File choosing the GNSS logging file data source.

This creates a GPS::GPS1 variable that is called in the CAPL script.
Start your scenario in CANoe. The HIL position of the GPS trajectory is sent to Skydel in real time during the simulation by CANoe using the HIL functions of the API of Skydel.

HIL scenario using the Car2x option of CANoe
This scenario intends to feed Skydel with Car2x trajectory from the CANoe software in real time using the HIL capability of Skydel. The objective is to create a Skydel scenario running in NoneRT mode with GPS L1CA and GALILEO E1. An additional Car2x licence of CANoe is needed to run the scenario.
The scenario should start at the beginning of the CANoe simulation and stop when stopping the CANoe one.
The DLL and VMODULE file are identical to the ones of the previous example.
CAPL script
Here is the CAPL script.
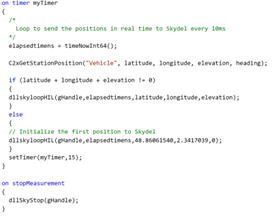
In that case, instead of a loop waiting for the change of a variable, a class named “on timer” has been used to execute a specific function at regular intervals. Every 15ms, a new position is sent to Skydel. The position is retrieved from the Car2x trajectory thanks to the C2xGetStationPosition function.
/!\ Be careful /!\ During the first milliseconds of the scenario, Canoe is not simulating the Car2x trajectory so the position sent to Skydel is (0, 0, 0). You should skip these values in order to avoid a big jump in Skydel.
Set up the scenario
Open your CANoe software and create a new Car2x scenario. Save it in your project folder.
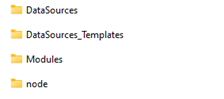
Go to your folder “C:\Users\Public\Documents\Vector\CANoe\Sample Configurations 17.2.88\Car2x\Car2x_US\MoreExamples\V2xTemplateJ2735-2016” and copy the folders “DataSources” and “DataSources_Templates”. Paste them in your project folder.
Your project folder should have the following folders now.
As in the previous scenario, load your CAN file in your ECU node and change its name to Vehicle. Also change the Network node section to “SAEJ2735_MsgSet::Vehicle”.
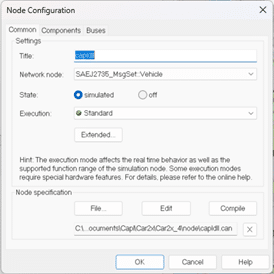

Then go to the Components section of the Node configuration and click on Add…

Choose the C2X_IL.dll file located in “C:\Program Files\Vector CANoe Family <your version>\Exec64.
Once done click on OK.
In the Tools panel click on Car2x Network Explorer .
Set the following parameters.

Then, in the Tools panel click on Scenario Editor to create your Car2x trajectory. In stations, click on New and create your route.

Then choose the speed of your vehicle.

Save it as Scenario.scn.
In Environment > Scenario Manager load the scenario.

Then in environment > Car2x Station manager, the station should look like this.
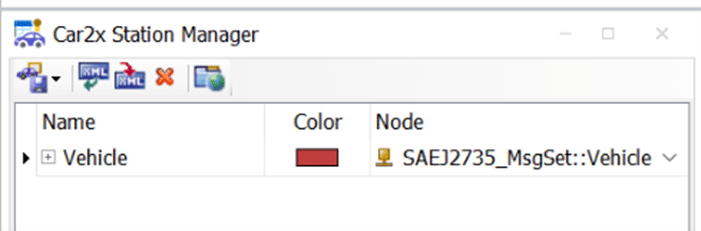
Your scenario is ready.
Launch it.

Conclusion
Skydel is a powerful tool for simulating almost any satellite communication scenario. In this document, we presented a method to create a CANoe scenario feeding Skydel trajectory in real time (HIL simulation) using a C++ shared library. We began by first showing the general method and then three examples of applications. The examples used are not exhaustive but are intended to help you understand how to establish communication with Skydel.
Note on all applicable images contained on this web page:
Copyright © 2025 par Vector Informatik GmbH
Contact support : https://www.safran-group.com/
Modification du code source original par Safran avec l’autorisation de Vector Informatik GmbH