Creating an Automated Multipath GNSS Signal Scenario
Tutorial
Introduction
In a perfect world, antennas would directly receive GNSS signals, without any interference or interruption. But, because the real world has tunnels, buildings, mountains, and any number of items that can block or interfere with a signal, a GNSS simulator must be able to replicate the indirect path a signal can take to reach an antenna.
To simulate this effect, we would – ideally – create a multipath environment or scenario.
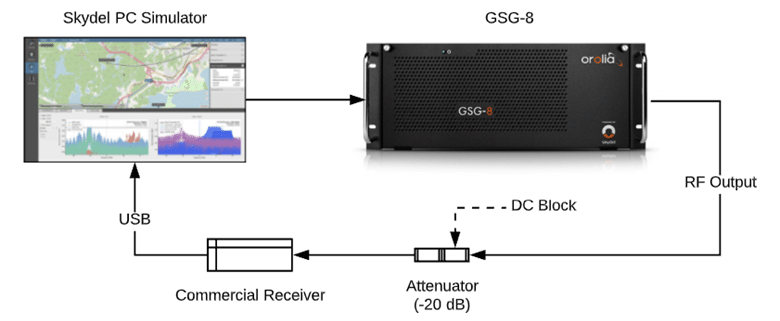
This document explains how to start an automation simulation with a GSG-8 and how to enable multipath effects with Skydel. This document will include a summary of the scripting steps and a detailed description of the classes and functions used to communicate with Skydel and create an example of a multipath environment.
To help create an automated GNSS multipath scenario, download the toolkit that contains a python script for use in the automation, as well as a Skydel configuration.
Why automate a GNSS Simulation?
Automation in Skydel helps you start using the API (Application Programming Interface) and create scripts to control Skydel remotely. Automation is key in being able to simulate a multipath environment. It has the ability to enable and disable effects, as well as the power to change multipath settings while the simulation is running – in real time.
Using the Skydel Python API has several advantages:
- Rapid configuration of the GSG-8
- Complete control of the simulation environment during simulation
- Less time needed to perform manual actions in the Skydel interface. Automation eliminates the need for manual interactions with Skydel while running a simulation.
Skydel provides API clients in the following languages:
- Python
- C#
- C++
- Labview
The Skydel API is intuitive and offers complete control over the Skydel engine. The Skydel GUI communicates with the Skydel Engine using this same API. Therefore, anything that can be done through the Skydel GUI can also be done through the Skydel API.
In this application note, we demonstrate an example of the automation feature in Skydel to enable multipath effects.
How Can Multipath Effects be Enabled Using Automation Inside Skydel?
The multipath phenomena refers to receiving replicas of a reflected and diffracted signal, distorting the Line-Of-Sight (LOS) GNSS signal. The delay of the multipath signal depends on the extra time of the travelled path by the reflected signal, which is longer than the direct signal’s path. In deep urban canyons, high-rise buildings and surrounding objects near the receiver cause indirect (reflected) signals – in addition to the direct LOS signal.
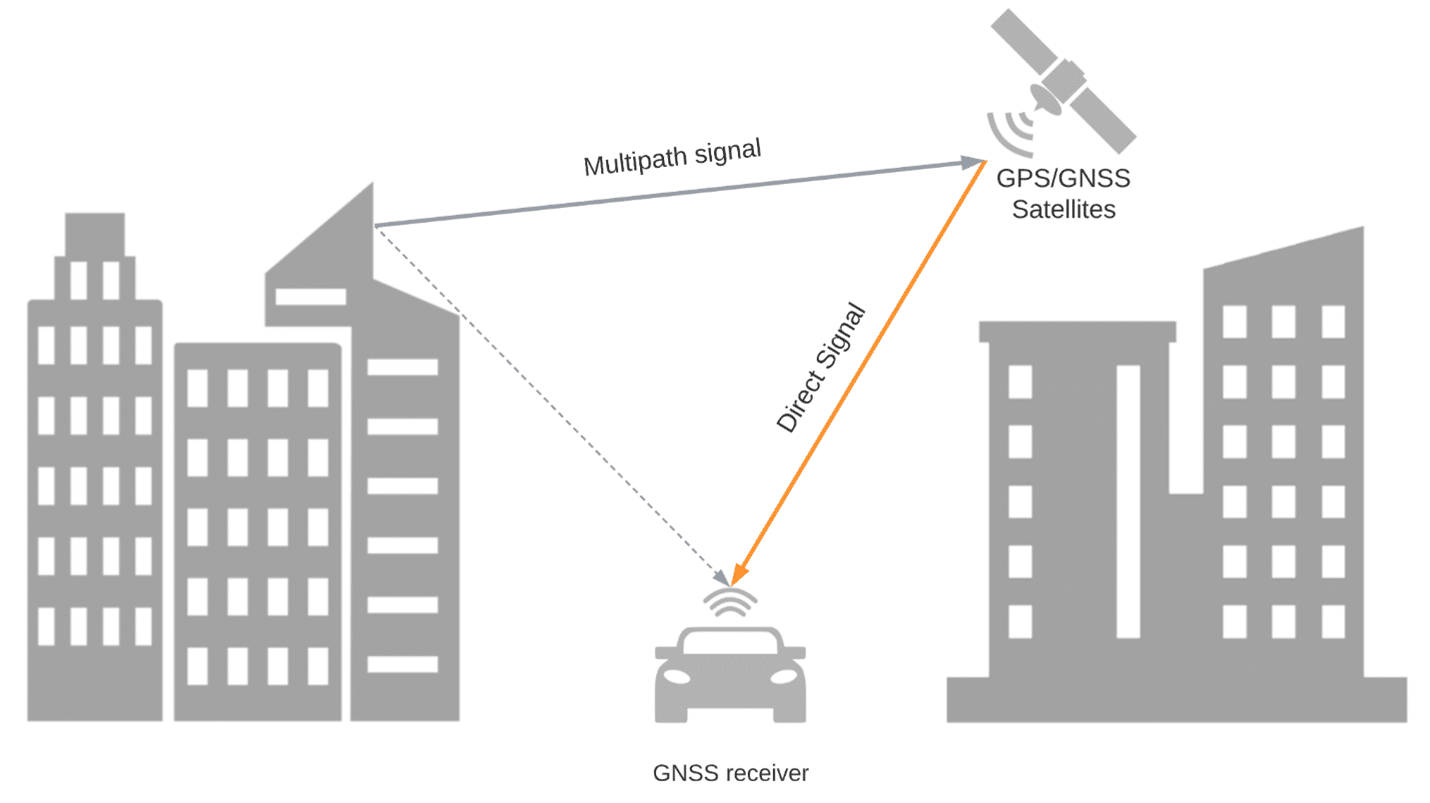
Due to one or several reflections, the path length of the reflected signal is extended compared to the length of the LOS path. This path extension is referred to as “multipath delay” and can be expressed in [meters]. Due to this path delay, the LOS component and the multipath signal phase are different. This signal is referred to as the “multipath relative phase” (expressed in [radians] or [degrees]). In the multipath case, the antenna receives the LOS component and the sum, plus all existing multipath components with dedicated multipath relative amplitude, path delay, and relative phase.
Automation with Skydel
1. Scenario description
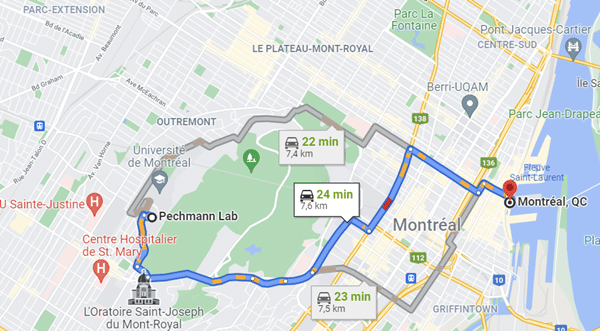
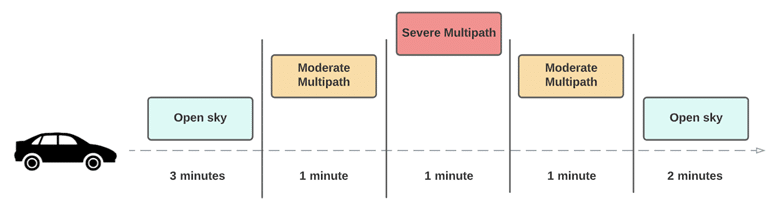
This scenario provides a simulated path through three types of Multipath environments. Situated in downtown Montreal, we will simulate an example of the effects of Multipath on a receiver.
- The first simulated environment is an Open Sky environment where no multipath effects were enabled.
- The second one is an example of a Moderate Multipath environment. We expect few multipath effects for some satellites with an elevation angle below 25 degrees.
- The last environment is an example of a Severe Multipath environment with more multipath effects for the most visible satellites.
2. Skydel Configuration
The GSG-8 hardware models that can be used to run this simulation are:
| GSG-811 | GSG-821 | GSG-831 | GSG-842 |
|---|---|---|---|
| 1 RF Output | 2 RF Outputs | 3 RF Outputs | 4 RF Outputs |
| 1 GPU / 1 SDR | 1 GPU / 2 SDR | 1 GPU / 3 SDR | 2 GPU / 4 SDR |
| Same configuration as BroadSim |
To launch Skydel on a Linux system, type Skydel-SDX in the terminal. In Windows, locate Skydel in the start menu and click it.
For our simulation, we connected the Septentrio receiver to get diagrams, but you can use the Ublox, which is a very common receiver.
Click Continue, and then select New Configuration.
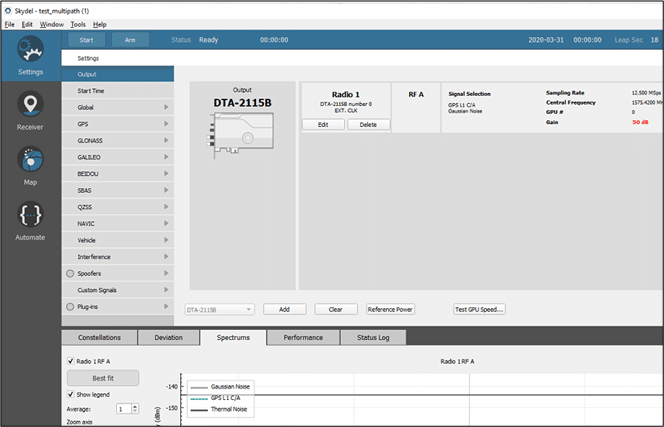
Add an output
To launch Skydel on a Linux system, type Skydel-SDX in the terminal. In Windows, locate Skydel in the start menu and click it.
Click Continue, and then select New Configuration.
Add signals
- Click on Edit in the Radio setting to set your radio configuration. Then, click Signal Selection – Edit to select your signal.

Set vehicle position
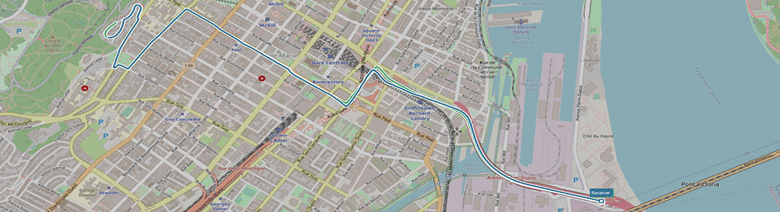
Next, we will configure our vehicle in a circular position.
Go to Settings –> Vehicle –> Body to set your vehicle position.
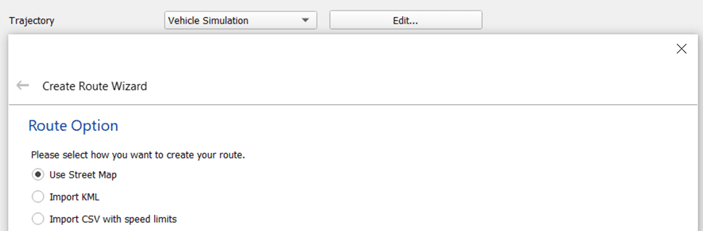
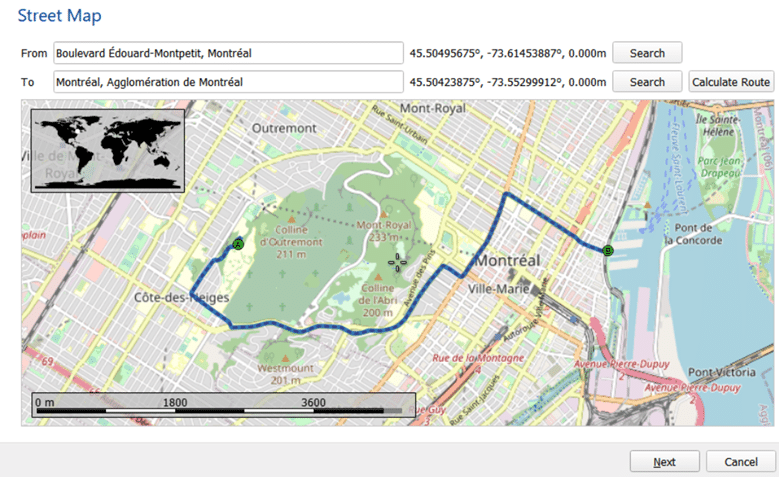
Select Vehicle Simulation in the trajectory, then select Use Street Map.
Enter your points of departure and arrival and click on Calculate Route. Click Next, and select your vehicle speed. Then click Finish.
To connect the Ublox receiver, go to the receiver menu and start by clicking the Connect button and choosing your receiver from the list of available ports.

3. Running the python script
Python Script Description
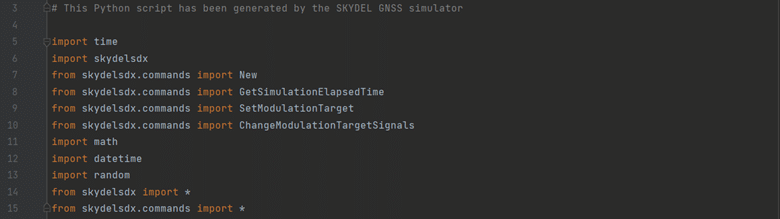
The first lines of the script (from line 5 to line 15) correspond to the imports of files necessary to execute the functions needed to launch the scenario. The * in some of the import lines commands the script to import all variables, classes, methods, etc. in the file without having to prefix into them when they are trying to be referenced in the script.
Line 17 is Skydel’s API command to initialize an instance, named “sim”, of the RemoteSimulator () class. “sim” can communicate with the Skydel instance by first initiating the connection using the IP and instance ID parameters in the connect () command (e.g. sim.connect (ip=”localhost”, id =0)/ ). Connect() defaults to a “localhost” IP address and either an ID of 0 for the RemoteSimulator () instance or 1 for the RemoteSpooferSimulator () instance. IP address must be put within ” ” (example: “192.168.0.100”).
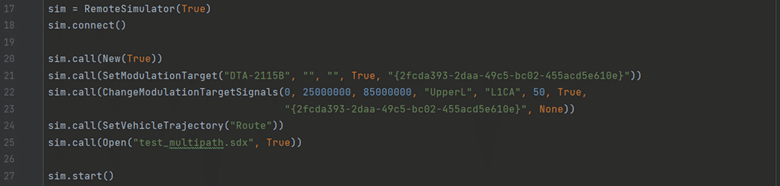
After connecting with the sim command, we now use the “call” command to send orders to the Skydel instance.
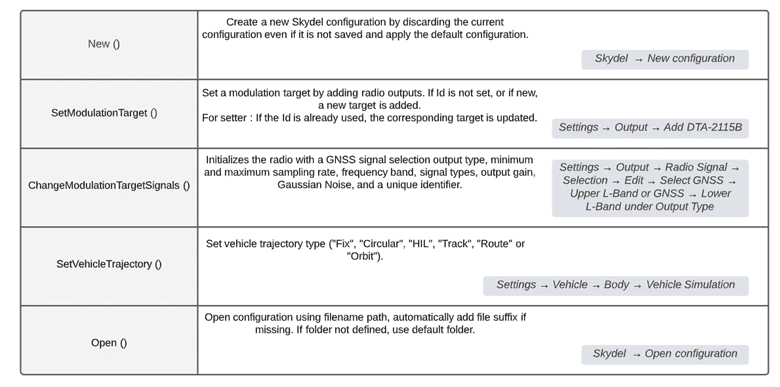
Below is a list of the commands that are used to start the Skydel configuration and select the Output:
Once the Skydel instance is fully configured, the scenario is ready to use the sim.start() command.
The next step to fully automate the multipath test is to define our function to get the time during the simulation. We use the command GetSimulationElapsedTime () to get the simulation elapsed time in milliseconds.
Note: Resolution is limited to 10Hz.

Main simulation:
Note that the central part of the simulation is made inside a While loop because we need to receive constant time information to apply our different multipath and NLOS effects.
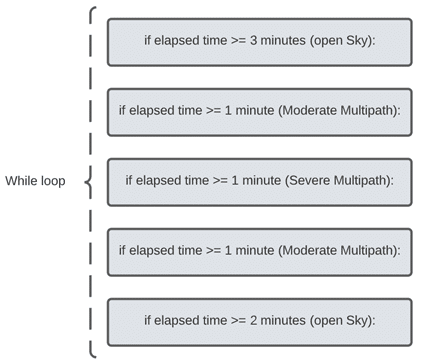
First Open Sky environment:
We do not add any multipath or NLOS effect; we leave the simulation by default. We let the simulation run with default settings for 3 minutes while waiting for the receiver to pick up the PVT from the signal and track the vehicle.

Moderate Multipath Environment:
In this section, after the first 3 minutes of Open Sky, we start by modelling a moderate multipath environment:
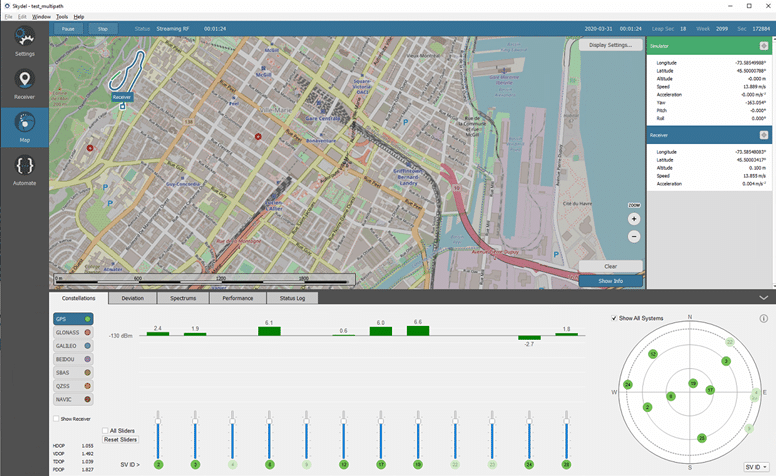
First, we use the GetVisibleSV () function to get the list of visible satellites.
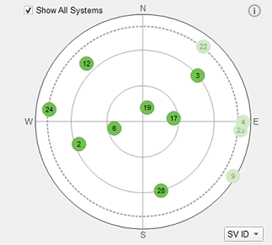
- List of all visible satellites are:
PRN = 2, 3, 6, 12, 17, 19, 24, 28
- Satellites with elevation angles below 25 degrees are:
PRN = 2, 12, 24
- Satellites with elevation angle above 25 degrees are:
PRN= 3, 6, 17, 19, 28
Then, we use the GetElevationAzimuthForSV () function to get the elevations of each satellite.
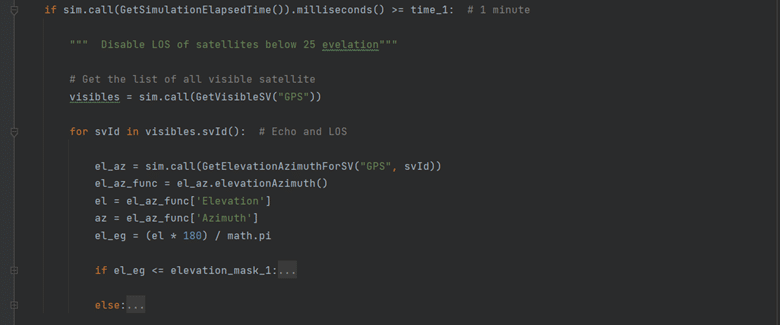
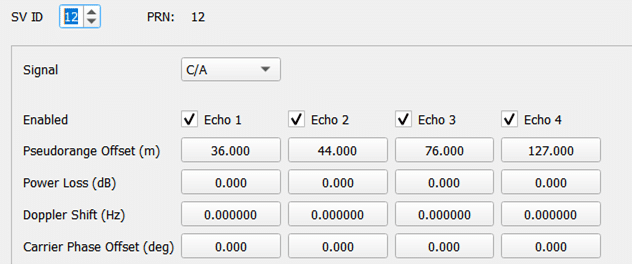
If the elevation angle is less than 25 degrees, we apply four multipaths on each satellite with the SetMultipathForSV () function, and we disable the LOS effect with EnableLosForSV ():
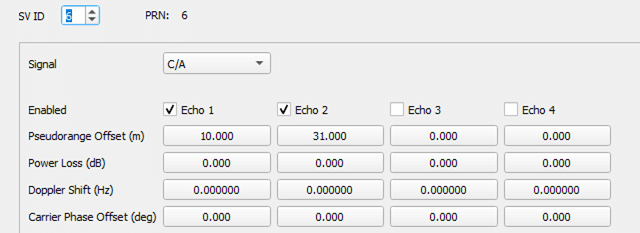
In all other cases (i.e. for all satellites above 25 degrees), we apply two multipaths on each satellite with LOS activated:
Severe Multipath environment:
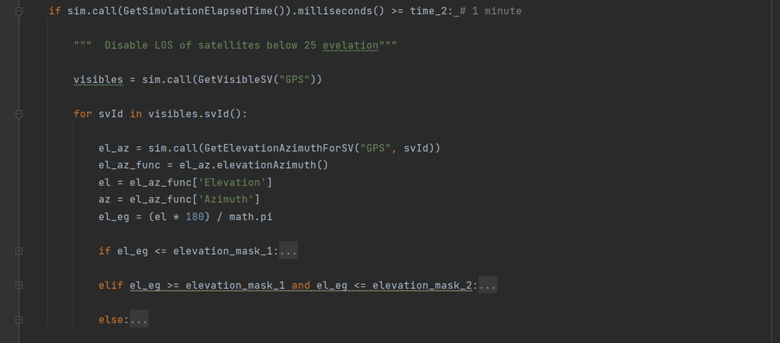
After one minute of simulation in the severe multipath environment, we apply echo values that are high compared to the moderate multipath environment:
If the elevation angle is less than 25 degrees, we deactivate the LOS and apply four multipaths on each satellite.
If the elevation angle is between 25 and 45 degrees, we apply four multipaths with moderate values and deactivate the LOS.
We also apply four moderate multipath effects with LOS in all other cases.
Repeat the same steps with the second environment of moderate and severe multipath.
Lastly, Open Sky environment:
In the last part, we return to Open Sky mode by disabling all multipaths and enabling all LOS.
Executing the Python Script
After the python script has been completed, the next step is to properly set up Skydel so the script can interact with it:
- Python and library installation:
a. Make sure you have a python from version 3.7 or download the latest python version from https://www.python.org/downloads/.
b. Open a terminal and check your python version:
$ python –version
c. Packages installation:
$ pip install -r requirements.txt
- Open the Test_automation.sdx on Skydel.
- Open a command prompt window, navigate your python script by typing “cd [.py folder location]”, and press Enter.

a. “cd” stands for change directory.
b. The “/Skydel-SDX/SDX/API/Python”
N.B: The directory should be the folder location of all python script examples provided by Skydel, as well as any python scripts that were created to automate testing. Note: If new folders are made for the python script, then the imports in the python script may need to be updated. Type “python [script name]” and press Enter to execute the python script.
- The script will then execute for 8 minutes.
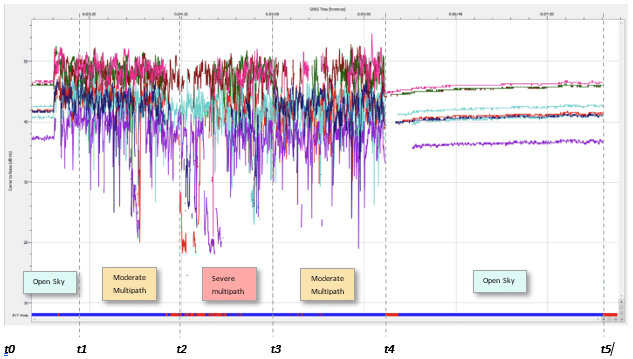
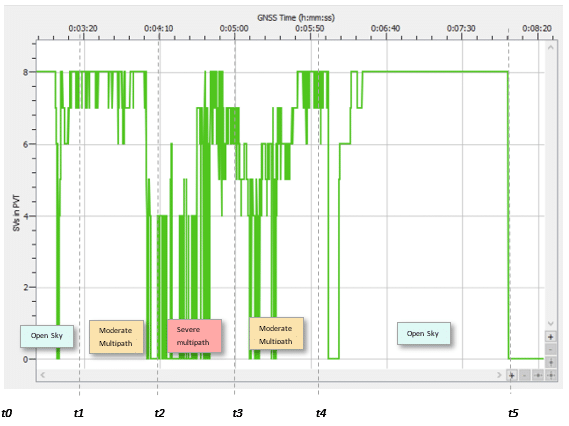
If a Ublox is connected to Skydel, it is possible to observe the receiver’s performance in Skydel’s Deviation window:
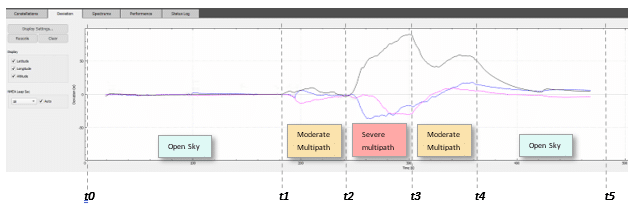
In the Deviation window, we see a considerable disturbance after 3 minutes (Open Sky) when we start to apply the multipath effect. Next, we can see the curve is stabilizing and returning to the values when we disable all multipath effects and return to an Open Sky environment.
Conclusion
By leveraging Skydel’s API python script, we created a multipath environment and enabled/disabled LOS.
Skydel provides an open feature to users to remotely control and generate several effects based on users’ requirements. Although this example provides an example of enabling and disabling multipath effects, the possibilities are limitless. Users can leverage the automation feature in Skydel as an open and creative way to impact a GNSS simulation. The Skydel Python API is a powerful tool that allows users to simulate complex simulations that would require more equipment and effort.
Powered by Skydel, the GSG-8 is a robust positioning, navigation, and timing test solution offered through Orolia’s GSG family of simulators. It was developed to deliver the highest standard of Global Navigation Satellite System (GNSS) signal testing and sensor simulation performance in an easy-to-use, upgradeable, and scalable platform.